
When it comes to image quality, correct technique is only half the battle. If you really want to get the best out of your camera you should also know what you're doing in the digital darkroom. That's not to say that post-production should replace camera techniques and the idea of getting it right as you're shooting - it shouldn't. It's just that if you want the maximum quality you'll be shooting Raw images, and if you shoot Raw images you'll need to process them to some extent.
Processing can be as easy or as difficult as you want to make it. You can simply apply a preset to a Raw image and make nothing more than a minor tweak to sharpening or noise reduction, or alternatively you may wish to take every aspect into your own hands and take time to process with utmost precision. Whichever way you go about it, there are a few things to bear in mind which should ensure your images don't result with any unsightly artefacts or obvious signs of editing. Here are seven common mistakes photographers make when it comes to processing and what you can do to avoid them.
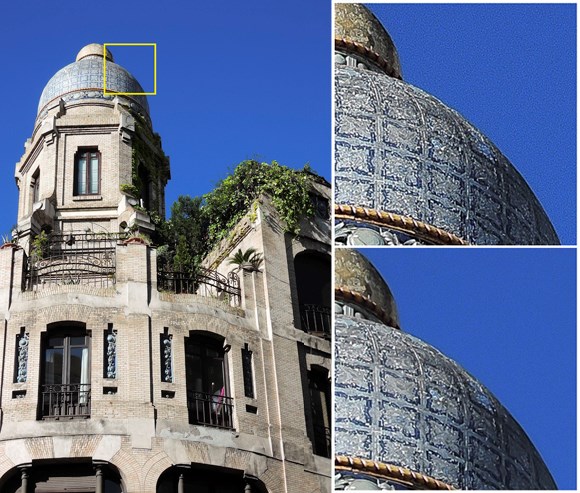
Compression artefacts
There’s no point in taking the time to process an image if you’re then going to apply a high level of compression upon saving. All this will do is destroy fine detail and introduce compression artefacts. These can appear as small blocks in flat areas (where it’s easier to spot them, on account of there being no scene details to mask them) or defined lines in areas of smooth tonal change, although it’s also noticeable in busier areas where the compression may struggle with fine details.
If you’re compressing the image to fit a particular size, and if you know you’ll only need it at a certain dimension and resolution, consider resizing it first. Then, either save it as a TIFF file or as a high-quality JPEG. If you’re saving the image for use later on, always save processed images as lossless TIFF files rather than JPEGs. Constantly opening and re-saving a JPEG decompresses and recompresses it, which again stands to affect its quality over time.
Top: original image
Bottom, left: JPEG Level 12 (low compression)
Bottom, right: JPEG Level 2 (high compression)
Over-sharpening
Due to the way images are captured by most cameras, it’s often necessary to sharpen them in post-production. JPEG images will typically have sharpening applied in-camera as part of their standard processing, although Raw images will require this along with other processing adjustments regarding colour, noise and so on.
Modest sharpening can help to give the impression of greater detail, although it’s easy to push this too far. When you do, a ‘halo’ effect can appear of the edges of details, which gives unnatural definition. Oversharpened portrait images can show this around single hairs, but, perhaps worse, around any wrinkles, blemishes and so on to give the skin more texture.
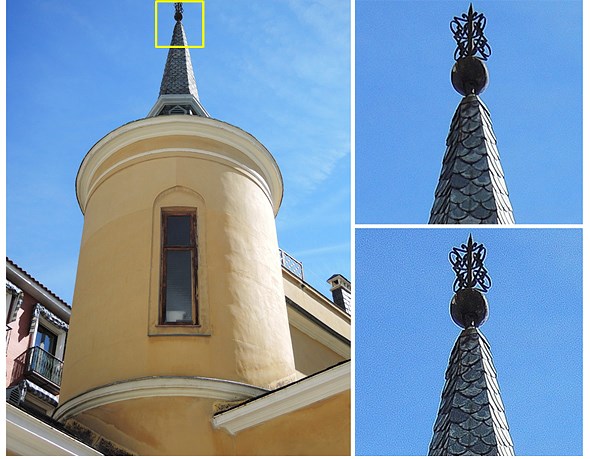
Left: original image
Top, right: Standard sharpening
Bottom, right: Over-sharpening
First, determine how your image is going to be used. If you’ll only ever use it online where it’s likely to be viewed very small, consider whether you’ll actually be able to notice any sharpening effects. Always sharpen when viewing your image at 100% so you can see the effect of your adjustments more clearly, and consider keeping an unsharpened version alongside the Raw file. This way you can always sharpen it to suit a different requirement as and when you need to without processing it again. Alternatively, you may just want to keep your Raw file in the same folder as the file created when you make adjustments by a program such as Adobe Camera Raw (it should do this automatically). Tip: always apply sharpening at the end of image processing, as other adjustments can affect how this appears.
Losing contrast
Generally, the most striking black and white images are those which show a broad range of tones, from shadows through to highlights. Many photographers worry about losing detail in both, which leads them to pull back as much detail as they can in highlights and bring up shadows to achieve the same goal. The result? A flat image which makes far less of an impact than it could on account of it showing too little tonal variation.
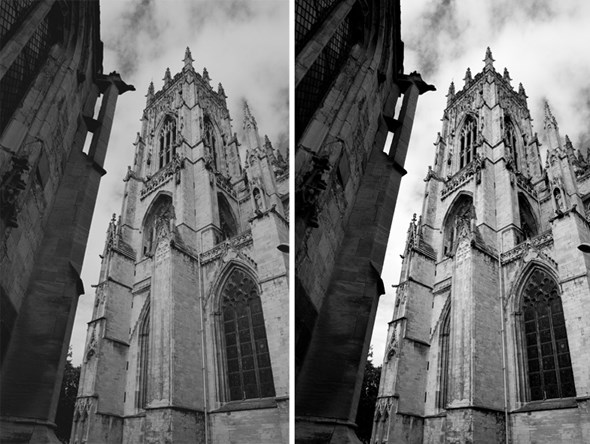
Left: poor contrast
Right: good contrast
Of course, not every image will have a perfectly balanced histogram as different scenes have different tonal makeups. High-key images, for example, will produce a histogram with little shadow detail, just as low-key image will do the opposite. But you should pay attention to the histogram as you process (assuming your chosen software program allows it) as this will help you to monitor the distribution of tones as you make your changes.
Losing highlights
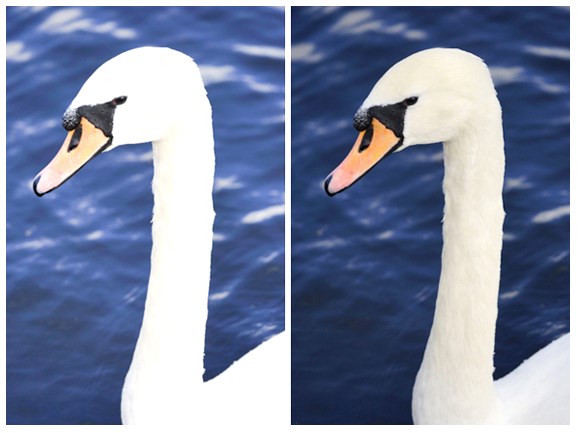
If you overexpose your image in camera, or push processing too far, you risk blowing the fine details in highlight areas. The images below demonstrate what happens here: all the lighter details in the swan's neck have been lost in the image on the left thanks through processing, while those in the original image on the right-hand side have remained. Which describes the subject better?
Keep an eye on your histogram while you're processing, and check to see whether tones have bunched up at the right of the graph. If you see a defined line on the right hand side of the graph (as in the histogram below) this means details have been made so light they they can longer be discerned in the image.
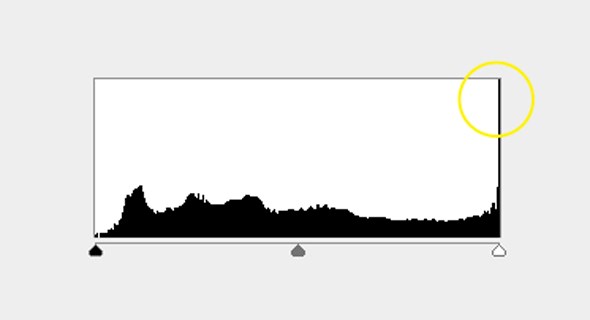
A histogram which shows highlights being 'clipped'
Not keeping things realistic
It's all too easy to keep nudging the saturation slider up to give colours a little more pep and lose sight of what's realistic in the process. Take the image below: do you really think the skies were this blue at the time of capture? Of course not. The image has quite clearly been processed to make it more visually appealing, and that's exactly how it comes across: processed.
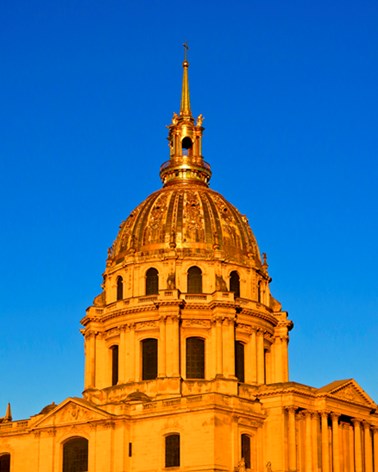
Although this image was captured on a fine day at sunset, the blue in the sky is a little too vibrant to be believable.
Make sure you don't process to the extent that the image becomes unbelievable. This doesn't just apply to colour, too; often, it's an overzealous hand on the dodging and burning controls that makes clouds appear a little too defined against the sky, and oversharpening, described above, is also common.
Depending on the software program you're using, you may be able to investigate your camera manufacturer's presets as you're processing, such as those for landscapes, portraits and so on. These are designed to adjust the different parameters to suit different subjects while still keeping things realistic, so it may help to run through these first to see what level of adjustment the manufacturer would suggest.
Processing JPEGs
JPEGs are designed to be used immediately, which is why they undergo processing in-camera. Raw images, by contrast, are designed to be processed later when time and care can be taken over the adjustment. Because of this, Raw files naturally contain much more detail and this can be processed in a non-destructive fashion – what this means is that your adjustments are processed as an overlay that can be removed, rather than at pixel level which is what happens when you process JPEGs.
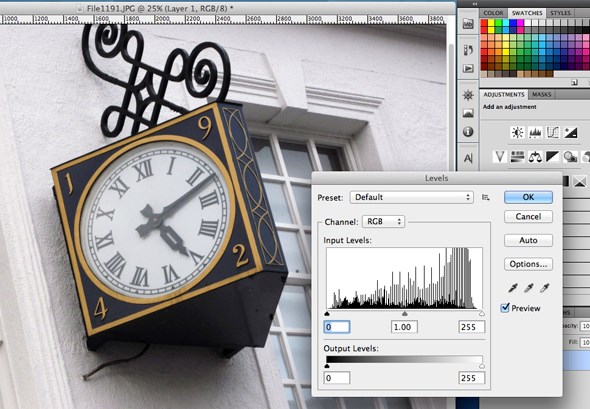
The histogram in the image indicates that the image is slightly posterized, a consequence of inappropriate processing. This is where smooth gradations are replaced with defined spikes.
JPEG images will be able to withstand minor adjustement, but for anything greater you’re better off starting with your Raw file. If you process JPEGs in the same way you risk blowing highlights, losing detail and generally degrading the quality of the image. The above histogram shows a JPEG whose quality has suffered as a result of inappropriate processing. In place of smooth gradations the histogram shows definitions between its tones, which shows up in the same way in the image (an effect known as posterization). If you're processing your image and you see this happen - stop! Go back to your Raw file and make your edits there.
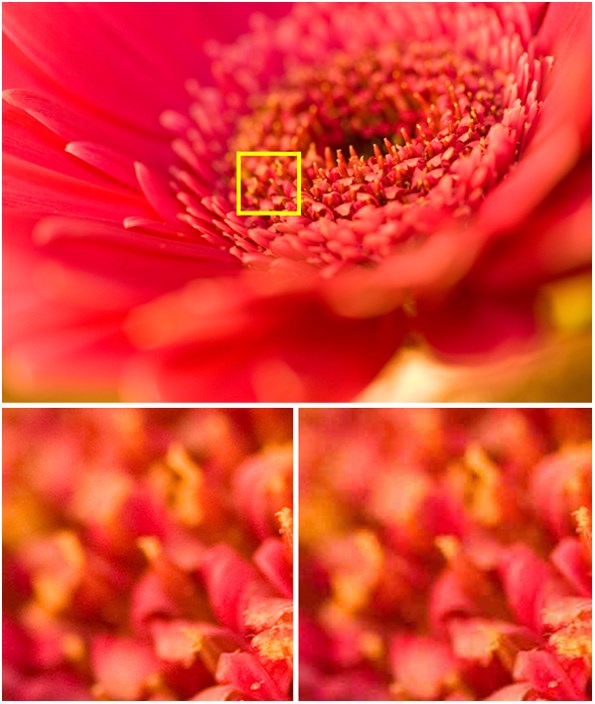
Inadvertently increasing noise
The level of noise reduction applied to an image can be selected in-camera, but if you're processing Raw images you can decide this yourself. Most Raw images will have some visible noise which you may or may not want to remove, although bear in mind that other processing steps you carry out can exacerbate any visible noise. Changes to contrast, exposure, brightness and sharpening can all accentuate any graininess or slight coloured patterning, and if you're not viewing your image at its full dimensions while you make these changes you may lose sight of how much noise appears as you do so.
Left: Original image
Top, right: oversharpening (increased noise)
Bottom, right: modest sharpening in conjunction with noise reduction
If you want to make sure you're not compromising the quality of your images, zoom in to 100% and look in areas where noise is most obvious. Experiment with different levels of noise reduction, sharpening and any other sliders you may have to hand to see what gets you the best result. Gentle noise reduction followed by a little sharpening is often the best approach for images with a little noise.
What are your image processing tips? Let us know below!
Related links
7 simple ways to take better holiday photos
7 simple ways to get sharper images
10 ways to improve your landscape shots
