Get better looking images in half the time by setting up a simple Lightroom workflow – Geoff Harris shows you how.

While Adobe Lightroom appears to be a fairly straightforward program for importing, managing and editing your Raw files, it has a seemingly inexhaustible number of options.
Indeed, Martin Evening’s definitive guide to the software, The Adobe Photoshop Lightroom 5 Book, weighs in at a bookcase-busting 710 pages, and goes into mind-boggling detail. The beauty of Lightroom, however, is that it can be as complicated or as simple as you need it to be, but it’s good to get into good habits with your workflow nonetheless.
Photographers bandy this term around like it’s something quite esoteric and complicated, but workflow simply refers to the way you organise the sequence of importing, managing, editing, saving and outputting your images. In other words, everything that takes place after you have taken the picture to outputting the edited version. While it’s impossible to compete with Martin’s book, here is a guide to setting up a basic (but resilient) Lightroom workflow system that should get you working smarter.
1. Getting ready to import images
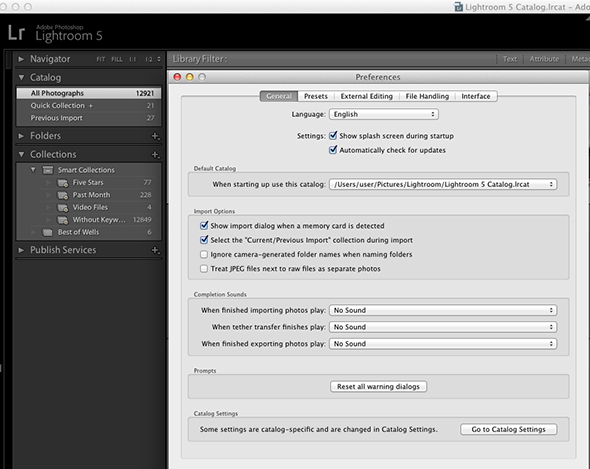
One of Lightroom’s strengths is also a weakness: it gives you multiple ways of doing the same thing and the sheer number of options can leave you totally lost. Lightroom differs from an image-browser program, such as Adobe Bridge, as it requires you to import images first into a ‘Catalog’ (either the main default one, or one you create). Remember though, the original Raw files are not changed – all you are ‘saving’ is an edited version you export back out from Lightroom, usually in JPEG or TIFF format. Let’s start by looking at an efficient way of importing some new Raw files from a memory card. First, go to Preferences, under theLightroom menu (Mac) or Edit (PC) and ensure that Show Import dialog when a memory card is detectedis selected.
2. Setting import parameters
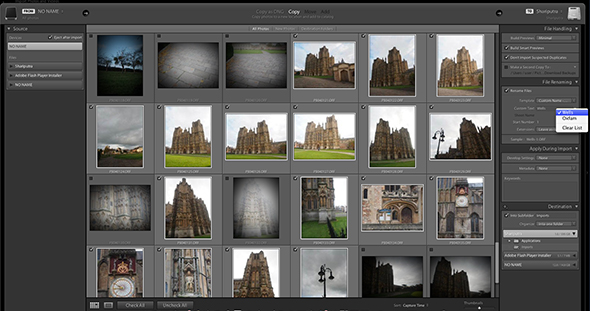
Once you plug in your card and card reader this box pops up, so spend some time checking out the many options and features. The first job is to decide which images are you going to import. The images appear as thumbnails, so this is the first stage of your image-selection process. Decide which images are good enough to import by ticking them (and use the Thumbnails slider at the bottom to make the image previews larger if necessary). Be ruthless here and try not to import lots of duplicates. In the above example, I can see some shots are either badly exposed or the composition is rubbish, so I make sure they are unticked. Remember also to select Copy from the top bar options; you would use Add to bring in images to the Lightroom catalog from an external hard drive, for instance.
3. Choosing the destination and naming
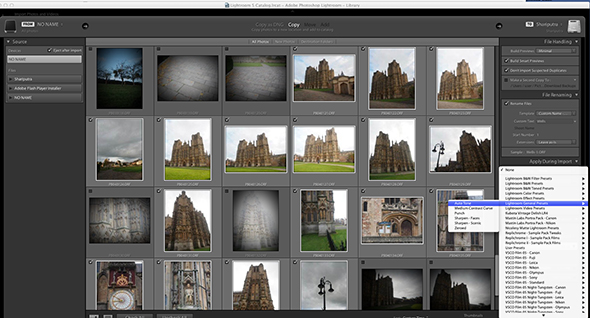
Look at the top right corner and Lightroom will tell you where it is importing the images – in this case, the Pictures folder on my hard drive. This is a good a place as any to store them, but I am also going to give the images more meaningful names to help me find them later (in this case I could choose Wells 1, Wells 2 etc). Meanwhile, the Destination option in the lower right corner allows me to save the images into a sub-folder, rather than having everything jumbled up in the Pictures folder. Then, via Apply During Import/Developsettings, I can also apply presets to all the images being imported, saving a lot of time later if I want a particular look. This is one of the tricks wedding photographers use to process hundreds of images in as little times time as possible. Metadata and keywords can also be applied at this stage, again making it much easier to find and manage images later.
4. Keywords and Quick Develop
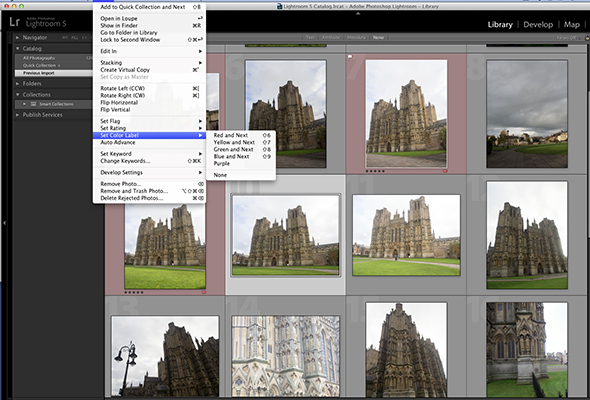
The selected images are now imported and appear in the main Library window. You will notice many more options down the right-hand side than you get with the initial Import window. Again, the first thing to do is to make the thumbnails bigger. I can then add keywords (in this case Wells, Wells Cathedral, Somerset etc) to make it easier to manage and find the relevant images later. You can edit the metadata too, but be careful as it’s easy to get disorientated; if you get lost, simply click None in the bar above the windows to get back to the standard Library view. Now is a good time to rate the best images: use the Photo menu to rate images by star or colour, or, alternatively, the spray-can icon at the bottom. Underneath the Histogram graph is Quick Develop, where you can add a preset, or adjust white balance and tone.
5. Making a Collection
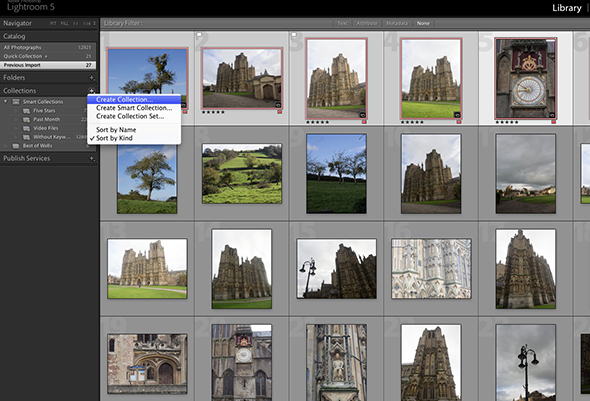
The next stage is to make a Collection. As the name suggests, this is just a collection of your favourite images from a particular shoot. Any Collections you create are listed down the left-hand side under, you’ve guessed it, Collections, so they are very easy to find. Using Collections is fundamental to setting up a good Lightroom workflow, but Collections should not be confused with Lightroom Catalogs. They are two very different things and get them mixed up at your peril. To begin with, it’s best to stick with Lightroom’s main default Catalog and then segment your work according to Collections. Here I have made a Collection called Best of Wells, based on the top-rated images I selected previously. Simply click the +/Create Collections option to make a new one.
6. Editing in Develop
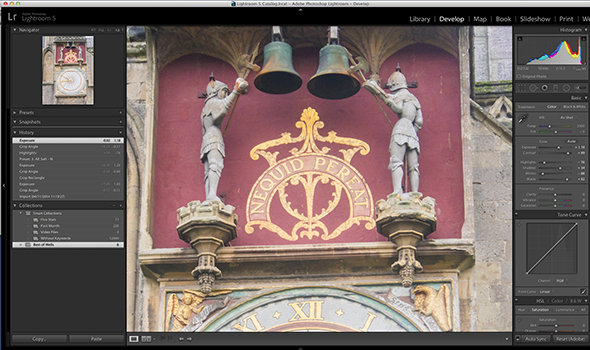
Now the real fun starts. To quickly find the images you want to work on, rather than having to scroll through everything in the main Lightroom Catalog, select your Collection from the left (in this case Best of Wells) and click Develop on the top bar. This brings up Lightroom’s main image-editing tools. The Develop module needs a tutorial in itself, but you can easily fix under or overexposure; change the white balance if you are shooting in Raw; boost the clarity and contrast; tweak the Tone curve, boost or reduce the Hue, Saturation and Luminance; sharpen and reduce noise; fix lens distortions; fine-tune images with the Adjustment Brush and so on. It’s simply fantastic. Look over to the left and you can easily apply presets or reverse any changes you have made by using the History pull-down menu (a real godsend).
7. Saving Images
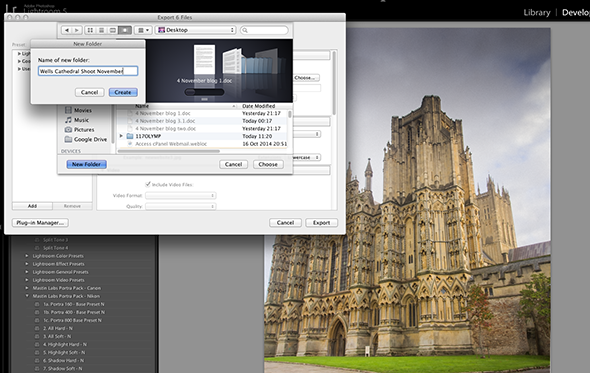
All this probably seems like a lot of work (it’s called ‘workflow’ for a reason!) but once you get your head around the core tools of Lightroom and learn to filter out a lot of the distractions, it soon becomes second nature. Collections can be further fine-tuned by setting up Smart Collections, but let’s not worry too much about that now. Once you have finished editing your Raw images in a Collection, simply go to File/Exportand you can save them as JPEG or TIFF files. Lightroom being Lightroom, there are tons of options here, so make sure you are saving the image in the right folder (which you need to specify), in the right image format, and at the right resolution. You can also apply some last-minute sharpening image to the image, depending on whether it’s being printed or viewed on screen.
8. Outputting options
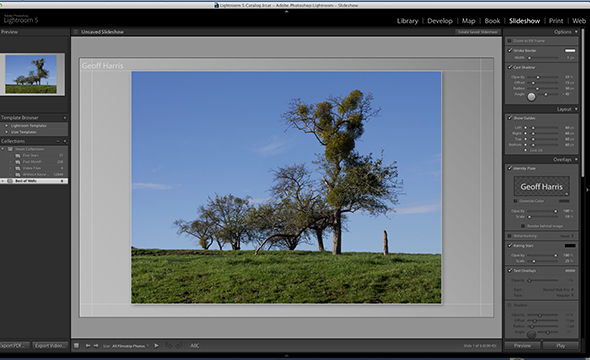
To the right of Lightroom’s top bar are options for creating photo books, slideshows, high-quality prints and even making a web gallery. The Photo book option is handy, but you may be able to order more books more cheaply by shopping around online. The Slideshow option, meanwhile, is an often-overlooked feature that is really worth trying out as it’s so easy (I know several wedding photographers who create Lightroom slideshows during a break on the big day). They can be easily viewed there or then, or shared via websites or social media. You can even add music. The Print option is obviously worth experimenting with for the best results, while Web enables you to make a web gallery for online publishing. It’s not particularly intuitive, though, and uploading galleries to your site via your WordPress template, for example, can be quicker and easier.
About the Author
Geoff is an experienced photography journalist and recently stepped down as editor of Digital Camera, the UK’s best-selling photography magazine. He now writes for a range of publications. Geoff is a keen travel and portrait photographer and a Licentiate of the Royal Photographic Society.

